How to Clean a Patio or Paver Surface
Pavers, stone and concrete patios all clean up well — but blast them too hard and you wash out the joint sand that holds everything in place. Gentle wins here.
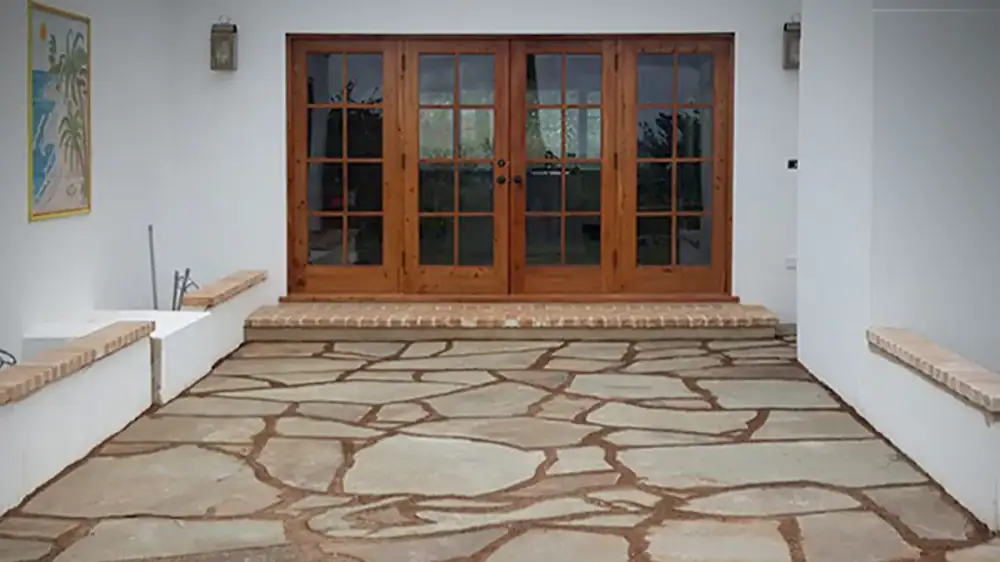
Clean a patio with gentle, low-pressure methods — the biggest risk on pavers isn't the stone but the joint sand between them, which high pressure blasts right out and leaves the pavers free to shift. Treat moss and algae as living growth with an appropriate cleaner rather than force, and plan to re-sand the joints afterward to keep everything locked in place.
A patio is where a lot of people learn — the hard way — what a pressure washer can cost them. The pavers come up gleaming, the transformation is instant and satisfying, and then over the following weeks the surface starts to feel loose underfoot, gaps open, weeds appear. The washing did not damage the pavers. It quietly removed the thing that was holding them together. Understanding that one mechanism is most of what separates a clean patio from a clean patio that stays sound.
What is actually holding a patio together
Here is the counterintuitive heart of the whole subject. On a paver surface, the pavers are not what keeps things stable — the sand packed into the joints between them is. That joint sand does two jobs at once. It locks the pavers against each other so they do not rock or shift underfoot, and it fills the narrow gaps where weeds would otherwise find a foothold.
A high-pressure stream aimed into those joints scours the sand straight out. The immediate result looks spotless, which is exactly what makes the mistake so easy. But with the sand gone, the pavers begin to shift and separate over the following weeks, and weeds move into the emptied gaps. What felt like a thorough cleaning had, underneath, undone the structure of the patio. So the guiding principle is not only "protect the surface of the pavers" but "protect the joints between them" — and that means lower pressure, a wide-angle tip, keeping your distance, and never aiming the stream straight down into a joint.
Different patios, different tolerances
The right amount of caution depends on which of a few common surfaces you have:
- Pavers (concrete or clay) live and die by their joint sand. Gentle cleaning and re-sanding are the twin priorities.
- Natural stone varies enormously — some types are far softer, more porous, or more easily etched than they look. A test spot and a gentle method matter most here.
- Poured concrete patios are more durable and behave much like other concrete, though even they can etch and stripe under too much force.
When you are genuinely unsure how much force a surface can take, pressure washing versus soft washing is a good reference for erring toward the gentle side — which, on a patio, is nearly always the right side.
Cleaning without excavating the joints
The safe method leans on cleaner and patience rather than force, and it reads almost like the opposite of a power-washing session:
- Sweep the patio to clear loose debris.
- Rinse gently to wet the surface.
- Apply an appropriate cleaner, follow its directions, and let it dwell so it can break down dirt, algae and moss.
- Scrub stubborn spots with a stiff brush — reach for the brush, not for more pressure.
- Rinse at low pressure, keeping the stream from digging into the joints.
If you do use powered equipment, keep it low, wide and well back. The mental image to hold is lifting the grime off the top, not excavating the seams between the stones. That single restraint prevents most of the damage this article is about.
Moss and algae in the shade
Patios that sit in shade or stay damp are magnets for moss and algae, and they are the growth people most often mishandle. Because these are living growth and not plain dirt, force is the wrong tool — it strips the visible green while leaving the roots behind, so it grows back, often within weeks. An appropriate cleaner treats the growth at its source. The same low-pressure approach used for algae on walls works on a patio floor.
And because moss and algae feed on moisture and shade, they will keep returning as long as those conditions hold. Improving drainage so water does not pool, and letting in more light where you can, does far more for the long term than any single cleaning. If the patio sits close to the house, keeping gutters clear so runoff is not dumping onto it removes one hidden source of the dampness that feeds the growth.
The step people skip: re-sanding
Because cleaning almost always washes at least some sand out of the joints, re-sanding is not an optional extra — it is what turns a clean patio into a clean, stable patio. The steps are straightforward:
- Let the surface dry fully before you add any sand.
- Fill the joints with appropriate joint sand, following the product's directions for sweeping it in and setting it.
- Do not skip it. Under-filled joints leave the pavers free to shift and the weeds free to move in — the very problems the cleaning was supposed to solve.
Re-sanding is the difference between a job that lasts and one that quietly comes apart. It is also a useful gauge of whether the cleaning went well: if you are watching sand pour out of the joints as you rinse, the pressure is too high or aimed too directly, and it is worth easing off before you finish. Watch, too, for pavers that rock underfoot, gaps that widen in the days afterward, etching on stone or concrete, or discoloration on natural stone from a cleaner that was too harsh — each is a sign to adjust rather than push on.
Most small patios are well within reach of a careful homeowner. It is worth calling in help when the area is large enough that re-sanding a great many joints becomes a project in itself, when stubborn moss or ingrained staining resists your efforts, when you have delicate or valuable natural stone and cannot predict how it will react, or when the job really calls for thorough re-sanding you would rather see done properly than half-filled.
Answers to common questions
Can I pressure wash a paver patio?
You can, but with real caution. The biggest risk isn't the pavers themselves — it's the sand in the joints between them. High pressure blasts that sand out, which loosens the pavers and invites weeds and shifting. Use lower pressure, a wide tip, keep your distance, and plan to re-sand the joints afterward.
What is joint sand and why does it matter?
Joint sand fills the gaps between pavers and locks them together, so the surface stays stable and resists weeds. If cleaning washes it out, the pavers can shift and separate. That's why gentle cleaning and re-sanding the joints afterward is central to cleaning a paver patio properly.
How do I remove moss and algae from a shaded patio?
Moss and algae are living growth that thrive in shade and damp, so they need an appropriate cleaner rather than just force. A cleaner treats the growth at the source; blasting it only removes the visible layer and lets it return. Improving drainage and light exposure helps keep it from coming back.
Do I need to re-sand my patio after cleaning?
Usually, yes, if cleaning has removed sand from the joints. Re-sanding restores the stability and weed resistance the joints provide. Let the surface dry, then fill the joints with appropriate joint sand according to its directions. Skipping this step leaves the pavers prone to shifting.
What's the safest way to clean natural stone pavers?
Natural stone varies a lot, and some types are softer or more porous than they look, so gentle methods are safest. Use low pressure and a cleaner suited to stone, test a small area first, and avoid harsh chemicals that could etch or discolor the surface.
Should I hire a professional to clean my patio?
Small patios are often manageable for careful homeowners. Consider a pro for large areas, for stubborn growth, for delicate natural stone you're unsure about, or when the job includes re-sanding a lot of joints and you want it done thoroughly.
Pressure Washing vs Soft Washing
One relies on force, the other on cleaning solution at low pressure. Matching the method to the surface is what protects siding, roofs and trim.
How to Remove Algae from Exterior Walls
That green film is a moisture problem, not just dirt. Here's why gentle cleaning beats blasting, how to protect plants and windows, and how to stop it coming back.
Can Pressure Washing Damage Siding?
The same force that strips dirt can crack panels, peel paint and push water into the wall. Here's how siding gets damaged — and the safer way to clean it.