Annual Siding Inspection Checklist
Siding is your home's first defense against water and weather. This once-a-year, ground-level check covers cracks, gaps, caulk, moisture and algae — with notes by material.
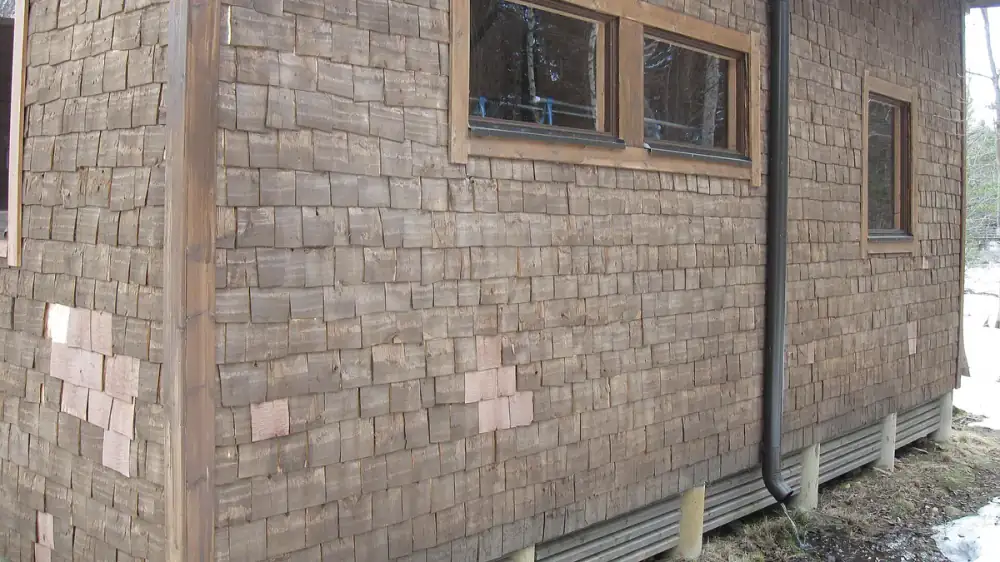
Read your siding as the skin that keeps water out of the wall, and inspect it once a year for the openings that let water in: cracks, gaps, warping, loose panels and failed caulk. The single finding that outranks all others is any sign of moisture already behind the surface, because that means the wall itself is wetting. Most of the check is a ground-level walk with binoculars for the high work, what you look for shifts with the material, and anything soft, spongy or out of reach belongs to a professional.
Siding almost never fails dramatically. It fails at the edges — a bead of caulk that shrank a millimeter, a nail head that let a panel lift, a hairline crack you would never notice unless you were looking for it. And because siding's whole purpose is to keep weather out of the wall behind it, those small failures are not cosmetic. They are the difference between water running off the house and water soaking into it. A yearly inspection exists to find them while they are still a tube of sealant and an afternoon, not a section of rotted sheathing.
The most useful mindset for this check is to stop admiring the wall and start interrogating it. Where could water get in? Where has it already been? Do a full lap of the house in good, raking light — early or late in the day, when shadows exaggerate every dent and lifted edge — and give the shaded, north-facing walls extra attention. Those stay damp longest and show trouble first. Binoculars handle the gables and the second story so you never have to reach.
The openings that let water in
Everything protective about siding depends on it being continuous. So the first pass is a hunt for breaks in that continuity.
Scan each wall for cracks, splits and holes in the panels or boards themselves, then move to the vulnerable joints: corners, trim edges, and the seams where lengths meet. The busiest failure points are the penetrations — every window, door, vent, faucet and light fixture is a hole cut through the skin, and each one relies on a seal that ages. Look for any spot where daylight, an insect, or a trickle of water could pass behind the siding. A gap the width of a pencil line at the top of a window is a genuine entry point, not a blemish.
While you are at it, read the panels for movement. Sections that have lifted, bowed, buckled or no longer sit flat have usually lost a fastener or expanded with heat, and each one opens a path behind the wall. Note anything that has visibly shifted, sagged or separated, and flag missing pieces for prompt attention rather than someday.
Caulk: the cheapest thing standing between you and a rot repair
It is worth singling out sealant, because caulk is almost always the first line to go and the least expensive to restore. A single failed bead around a window can feed water into a wall for a year before anything shows inside.
Work around the windows, doors, trim and every penetration, and look closely at where the siding butts against a different material — brick, stone, or the top of the foundation. You are looking for caulk that has cracked, shrunk, hardened, pulled away from one face, or gone missing entirely. Anything failing here earns a place at the top of the list, ideally resealed before the wet season rather than after it. This is the rare exterior task where a small, cheap, ground-level fix reliably prevents an expensive one.
Following the trail of moisture
This is the part of the inspection that actually protects the structure, because it looks for water that is already getting in — the damage you cannot see directly.
Watch for staining, dark streaks and discoloration, especially below windows, along seams, and beneath the roof edge. Where you see it, press gently on the material: anything soft, spongy or crumbling means rot has started behind the surface. Peeling or bubbling paint is another quiet signal, since it often means moisture is trapped underneath and pushing the finish off. And pay close attention to any wall living under an overflowing gutter or a splashing downspout — that is a manufactured moisture source, and it stains and rots siding faster than weather ever would. When the trouble traces back to water spilling from above, the repair starts at the roofline, not the wall; see why water runs behind gutters and the companion annual gutter inspection checklist.
Algae and mildew belong in the same conversation. Green film and black speckling favor the shaded, damp, north-facing walls and the splash zones near downspouts. A little is a cleaning job. But staining that keeps returning after you clean it is trying to tell you something — that the moisture feeding it is coming from behind the wall, not settling on its face. For method, weigh how to remove algae from exterior walls against the gentler approach in pressure washing vs soft washing, and lean gentle — high pressure drives water behind panels, which is the exact failure you are inspecting to prevent.
Where each material tends to give way
The inspection above works on any wall. What changes is the failure it is most likely to find, and how forgiving the material is when you clean it.
| Material | Watch for first | Cleaning note |
|---|---|---|
| Vinyl | Cracking and brittleness in cold, warping or melting near heat, loose panels after wind | Low pressure only — water gets behind it easily |
| Wood | Rot, splitting, insect damage; peeling paint and failed caulk as early warnings | Keep paint and sealant maintained; gentle wash |
| Fiber cement | Cracked caulk, chipped paint and gaps at the joints it depends on | Gentle; protect painted joints |
| Aluminum and metal | Dents, scratches and chalky oxidation; loose sections after storms | Wipe down chalking; avoid abrasion |
| Stucco and masonry | Hairline-to-larger cracks, spalling and efflorescence; freeze-thaw widens cracks | Low pressure; seal cracks in dry weather |
Read your own walls against the row that matches them, and you will know which findings are ordinary aging and which deserve a second look. Freeze-thaw, in particular, is why spring is such a natural time for this check: a winter of expansion and contraction is very good at opening gaps that were snug in the fall.
The judgment at the end is simple. If the check turns up openings you can seal and surface stains you can wash, that is ordinary upkeep. But soft or spongy material, evidence of moisture or rot behind the siding, large cracks or missing sections, caulk failing across the whole house, or damage on a story you cannot safely reach — those are a professional's work, not a weekend's. So is staining that shrugs off every cleaning, because the real problem is likely inside the wall. Catching any of it during a single yearly walk is what keeps a sealing job from becoming a structural one.
Common questions
How often should I inspect my siding?
A thorough inspection once a year is a sensible baseline, ideally paired with quick looks after major storms. Spring is a natural time, since winter's freeze-thaw cycles tend to open gaps and crack caulk. Homes with heavy shade, coastal exposure or older siding may benefit from checking more often. Between inspections, a monthly glance catches new damage early.
Can I inspect siding without a ladder?
Most of it, yes. Cracks, gaps, warping, loose panels, failing caulk, staining and algae are all visible from the ground, and binoculars help with upper walls and gables. Save close inspection of hard-to-reach areas and any repair for a professional, especially above the first story.
What are the warning signs of siding problems?
Look for cracks, gaps and holes; panels that are loose, buckled or warped; soft or spongy spots; failing or missing caulk around windows, doors and penetrations; peeling paint; and staining or algae on shaded walls. The most important sign is any evidence of moisture getting behind the siding, because trapped water leads to rot and mold in the wall.
Does siding maintenance depend on the material?
Yes. Vinyl can crack in cold and warp near heat; wood needs paint and caulk maintained and is prone to rot; fiber cement relies on intact caulk and paint at joints; aluminum can dent and chalk; and stucco and masonry develop cracks that let water in. The inspection is similar for all, but what you watch for and how gently you clean varies by material.
Should I pressure wash my siding?
Often no — or only with care. Many siding materials do better with low-pressure soft washing than a high-pressure machine, which can force water behind panels and damage softer surfaces. Match the method to the material, and when in doubt choose the gentlest approach that removes the dirt or algae without driving water into the wall.
When should I call a professional about my siding?
Call a pro when you find soft or spongy areas, signs of moisture or rot behind the siding, large cracks or missing sections, widespread failing caulk, or damage on upper stories you can't safely reach. Also call if algae or staining keeps returning, which can signal a moisture problem behind the wall rather than just a surface issue.
Related reading

Winter Exterior Home Maintenance Checklist
A grouped, printable winter checklist for snow, ice, frozen gutters and storm damage — built entirely around safe, ground-level observation and knowing when to call a pro.
Autumn Exterior Home Maintenance Checklist
A grouped, printable fall checklist for leaves, pine needles, gutter guards, downspouts, roof edge and freeze prep — with an emphasis on safe, ground-level work.

Post-Storm Exterior Inspection Checklist
A grouped, printable checklist for post-storm home exteriors, focused on safe ground-level observation and knowing when to call a roofing professional.